How many times have you started a guide to building your site and all of a sudden you’re told to do a gazillion things!
Something simple is now rocket science! WHY!?!
I’m going to give you the absolute foundations and how to apply them rather than the “luxuries” that so many other tutorials get confused.
When you’re new to this world so many people say you “need this” and you “need that” but in reality, you don’t.
With that being said once you’ve finished this blog, you will have a website up and running with a solid foundation.
Here is what I’m going to cover in this blog:
- Domain
- Hosting
- WordPress
- The One WordPress Tool You Will Ever Need
- SEO – SUPER SIMPLIFIED
Domains
What Is A Domain
A domain is a unique title people will enter into Google and be able to find your website.

Domain Examples
An example of a domain is
- Facebook.com
- Youtube.com
- Wikipedia.org
- forbes.co.uk
Etc…
Domain Extensions
A domain extension is the end of the domain, for example:

- .com
- .co.uk
- .org
- .net
- .biz
- .local
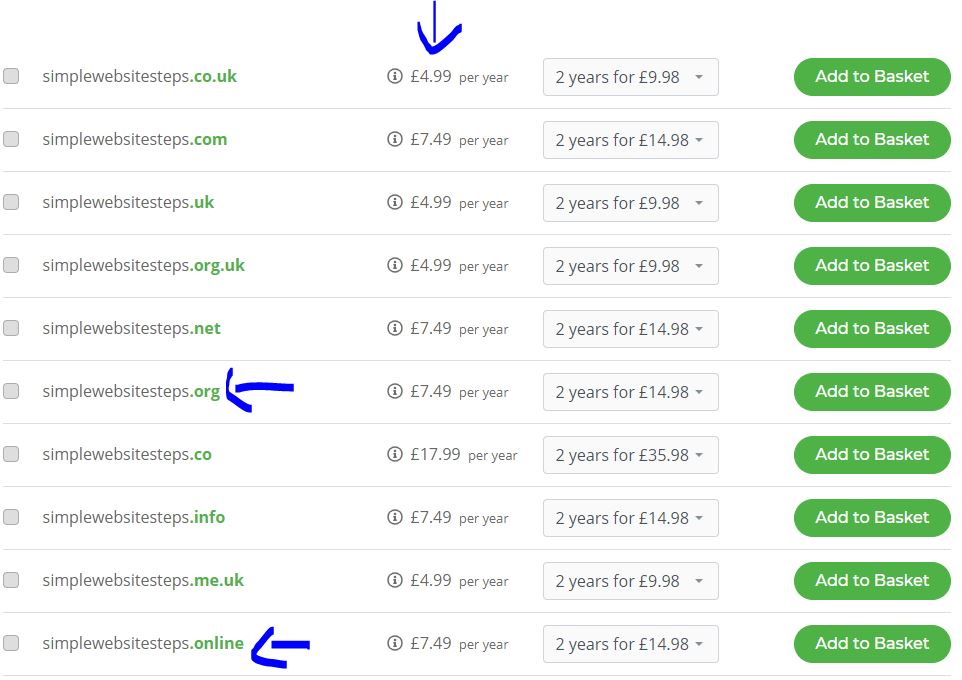
Depending on your business or project will vary on the sort of extension. The most common domain extension is “.com” followed by “.co.uk” – these are so common that people are trained to use “.com” or “.co.uk” as the first instance when searching online. Try to play it safe with choosing a domain and go with a .com or .co.uk for your first website.
Domain Pricing
Domains will vary on pricing for the following:
The keywords in the domain, the more common the keyword, the more expensive it will be.
- The extension
- The length of the domain
Ideally, you should be able to get a domain from £4.99 – £16.99 unless you’re going for a super short and focused keyword which can cost upwards of £3000.
Where do I buy a Domain?
You buy a domain from a domain registrar. These are companies that sell domains and often hosting as well.
You can often get a special deal like free domain when you purchase hosting with the firm.
I’ve found you an exclusive deal to get you super cheap hosting and domains. Click here: DISCOUNTED LINK
How Do I Buy A Domain
Buying a domain is a straightforward process. If you click this link Click here: DISCOUNTED LINK you will be taken to the special deal I found for you.
From this special link you get:
- hosting from $2.75pm (usually $12.99 pm)
- free domain when purchased hosting
Let’s move onto hosting and what it is.
Hosting
What is Hosting?
Hosting is the storage place for your website. Without hosting your website will not be seen by people. You need this if you want a website to be visible.
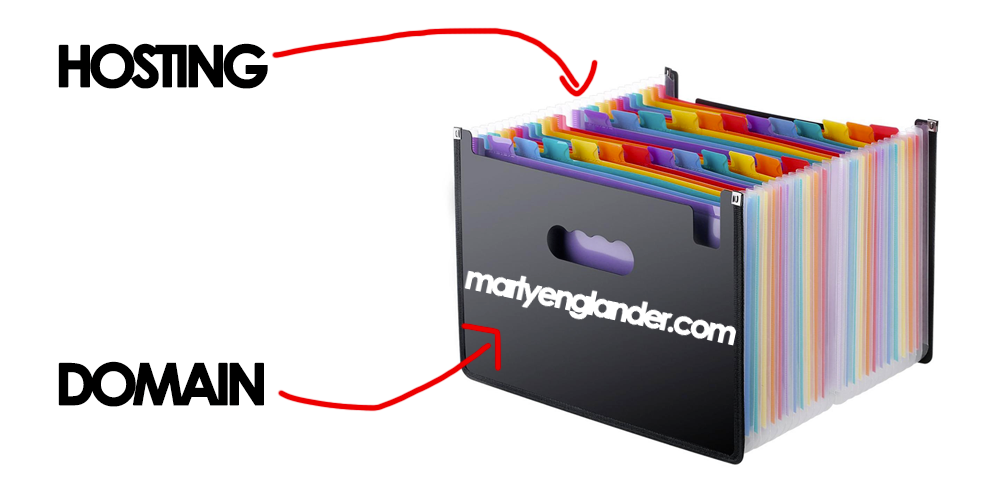
The difference between hosting and a domain is like this.
Imagine a folder. A folder has a name. Inside the folder usually contains lots of files.
A domain is the title of the folder.
Hosting is the container holding everything together.
Different Sorts Of Hosting
All the different sorts of hosting can get complicated, but we are going to focus on the one I’m recommending below.
When you purchase hosting, you will get given access to something called a Cpanel.
The Cpanel is a platform which has lots of different options and where you can access all the files on your website.
It also can hold all the emails you have for your domain.
Basically, everything to do with your website you will be able to edit from your Cpanel.
Ideally, the only things you’re ever going to use on your Cpanel is
- File manager
- The file manager will contain all your website files
- Email Accounts
- This is where you create email accounts and manage them
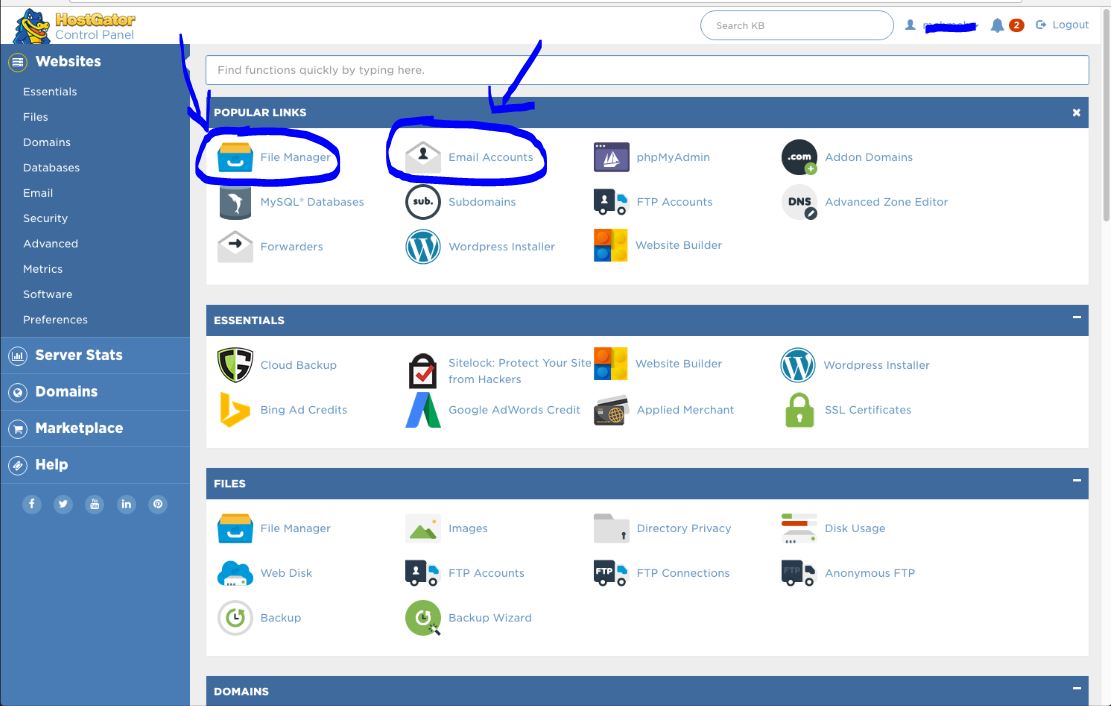
That’s really all you will be using on the Cpanel.
Where Do I Buy Hosting?
I’m going to recommend using this link Click here: DISCOUNTED LINK so you can get a discount on your hosting. It’s also a simplified way of getting started and will be more than suffice for beginners.
Once your website starts growing you will want to upgrade your hosting but until then don’t fall into the trap of super expensive hosting until you need it.
How Much Is Hosting?
Hosting prices varies depending on the provider and the plan you purchase.
You can be looking at paying anywhere from £5.99pm – £1000+ pm.
The link above/below will give you discounted hosting for $2.75 per month which is a bargain for beginners.
WordPress
Installing Your WordPress Website
In this section, I’m going to walk you through the whole setup process of setting up your website.
I will cover every step from finding, purchasing and implementing your website. If you follow every step, you will have 0 trouble – if you do have an issue at all please comment at the bottom of this post and I will respond within 24 hours.
Here is a video I’ve seen which is current and 100% up to date with step by step instructions.
Credit goes to Greg Narayan
Step One: Selecting A Hosting Package
You will now see the discounted hosting packages. These packages have the discount already applied. See below
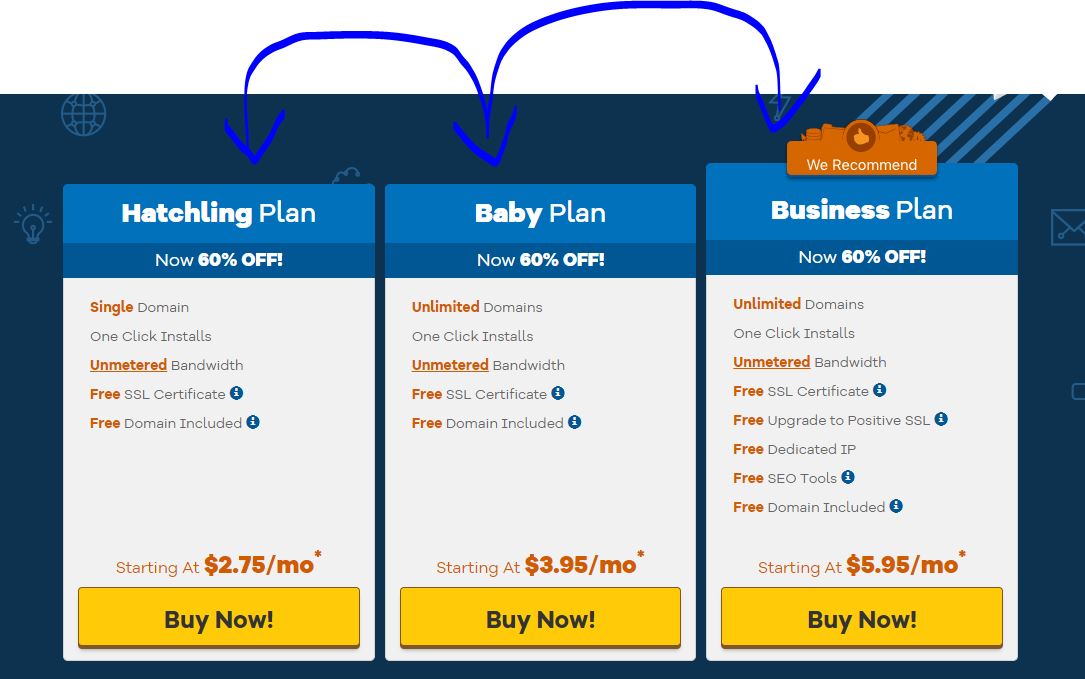
You are given a choice of three packages.
Each one is almost the same as the one before, but the main difference is the effect each package will have on the speed of your website.
I recommend going to the “Business Plan” but whichever one you choose will be okay.
Step Two: Buying a domain
Once you’ve clicked the link above you should see a page like this:
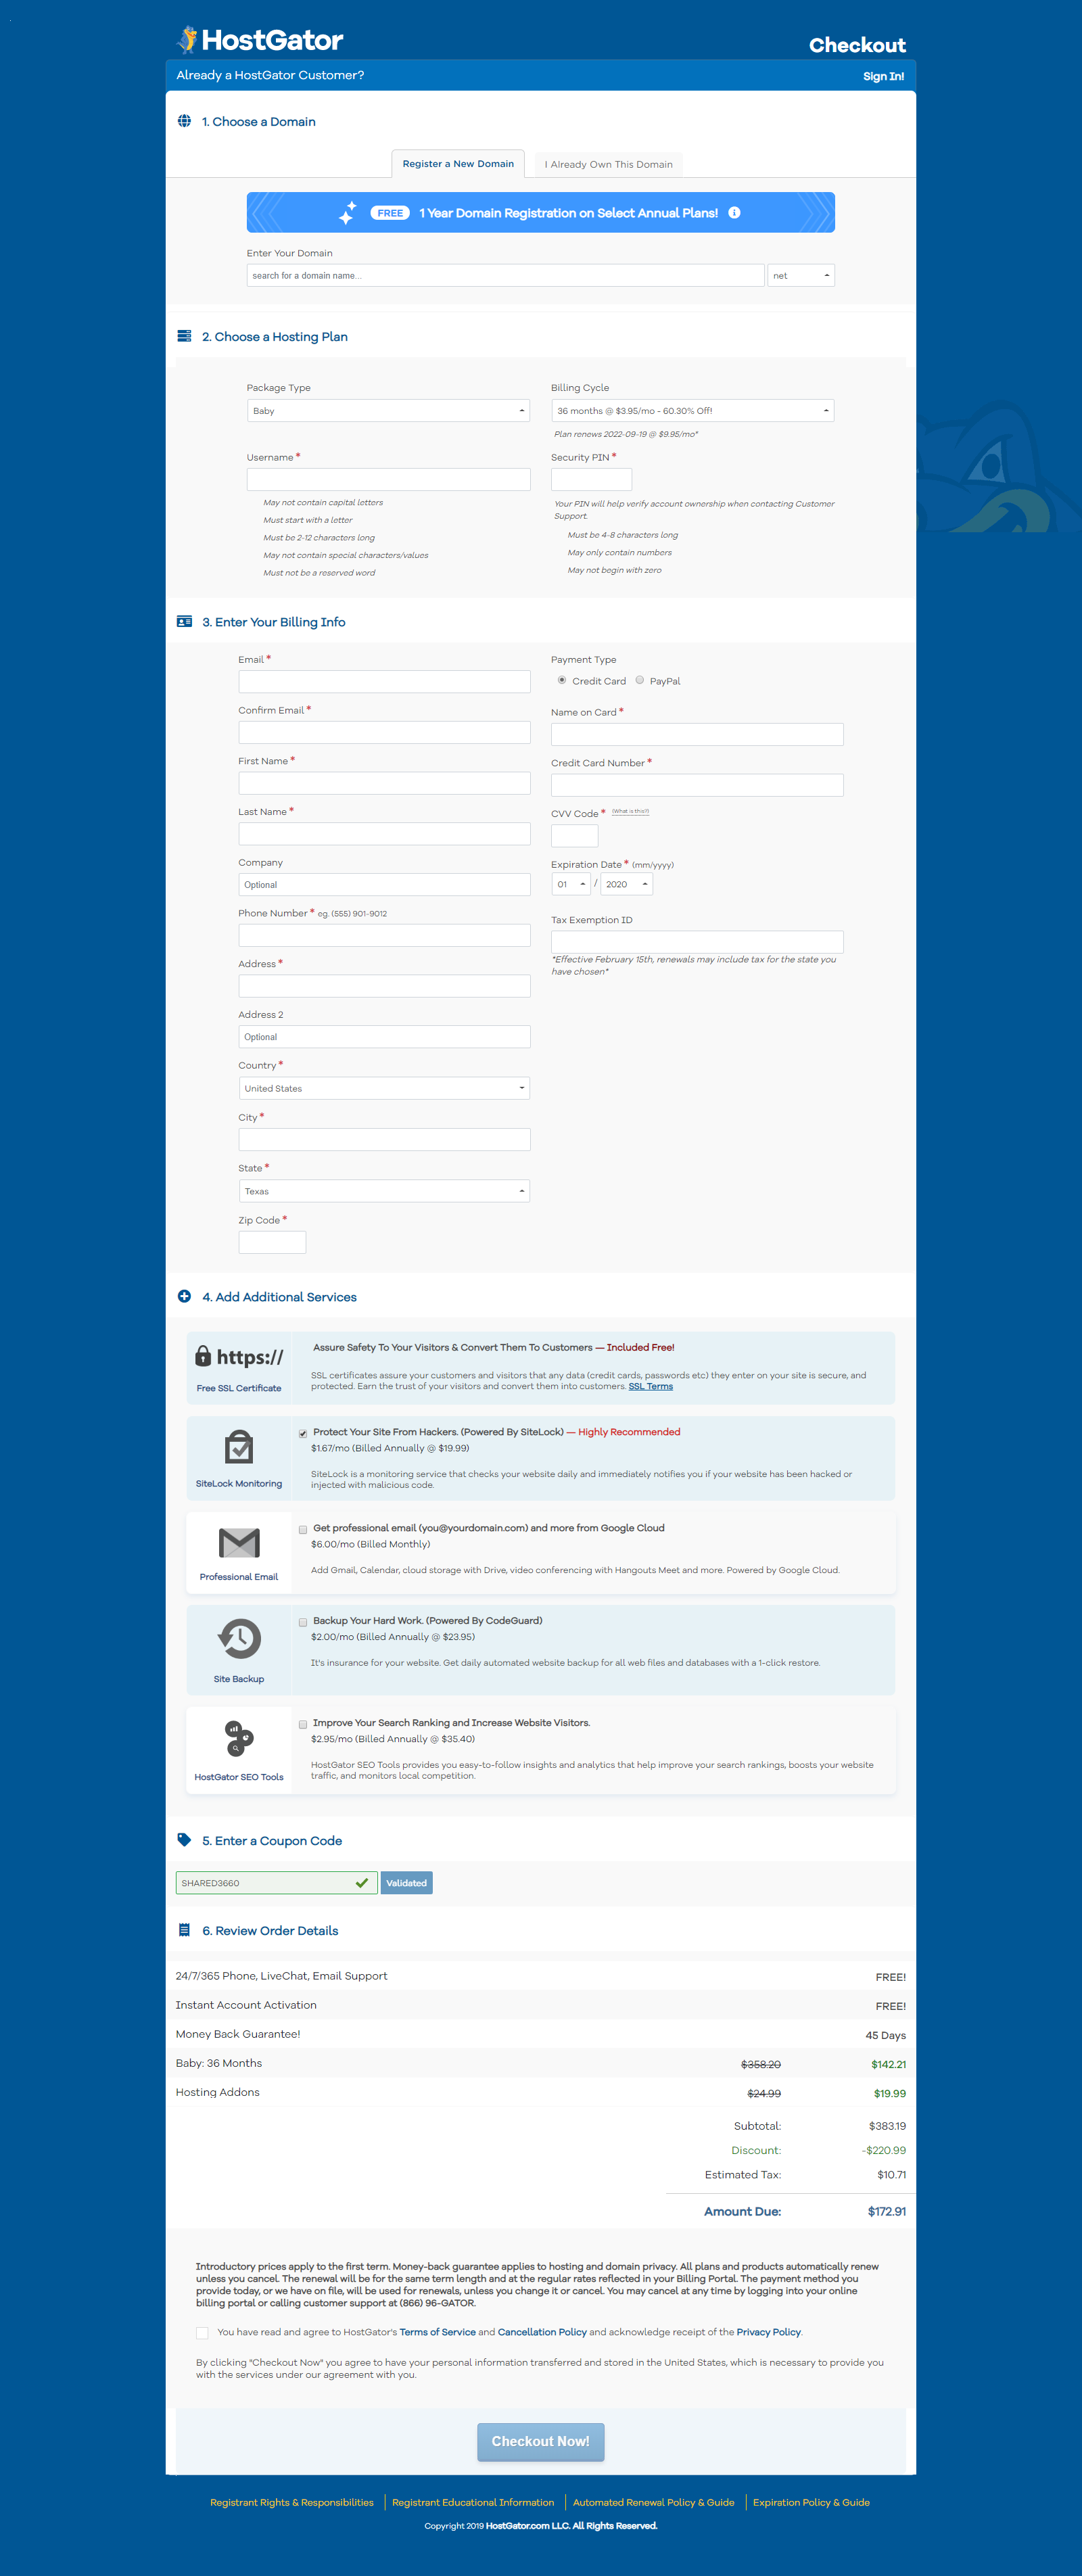
The page is broken down into four main sections.
Here is what each section means and what I recommend you to tick.
Section One – Finding A Domain
Enter the domain you want to purchase and select the extension you want. (.com, .co.uk etc…)
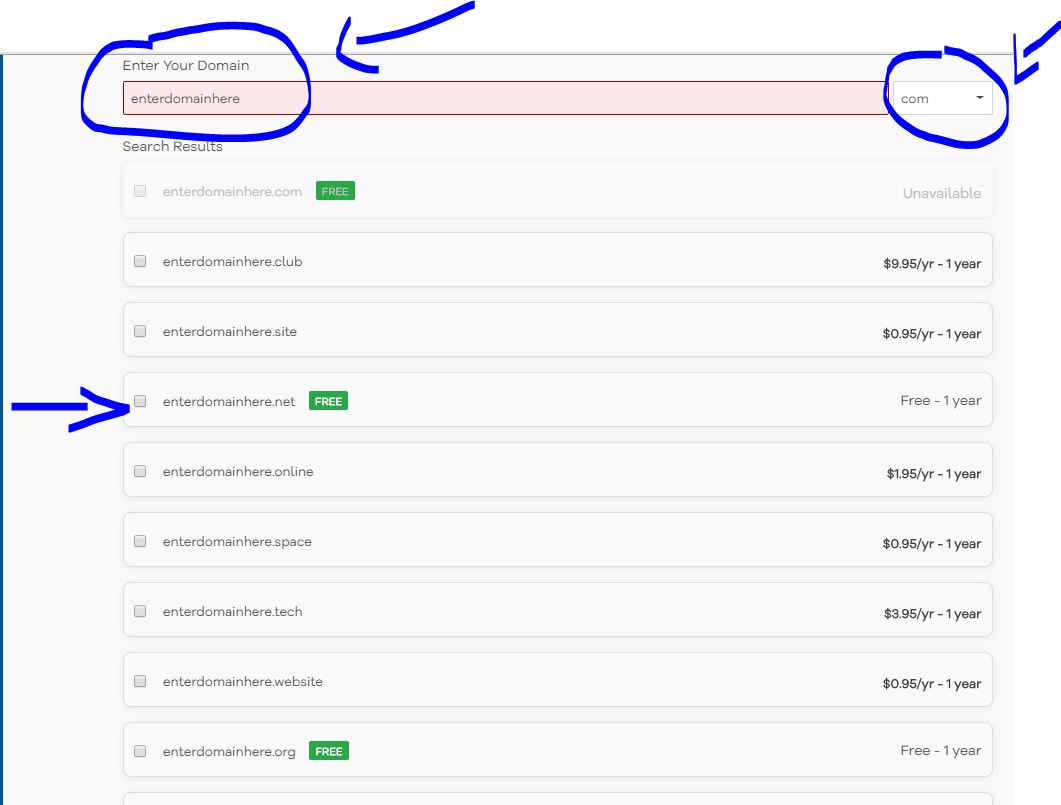
It will ask if you want “domain privacy” – domain privacy is hiding your contact details from the public. I would recommend this, so you don’t get Indian salespeople contacting you trying to sell you a website. VERY ANNOYING.

Section Two- Choose a Hosting Plan
Here you will be asked which package type and billing cycle you want.
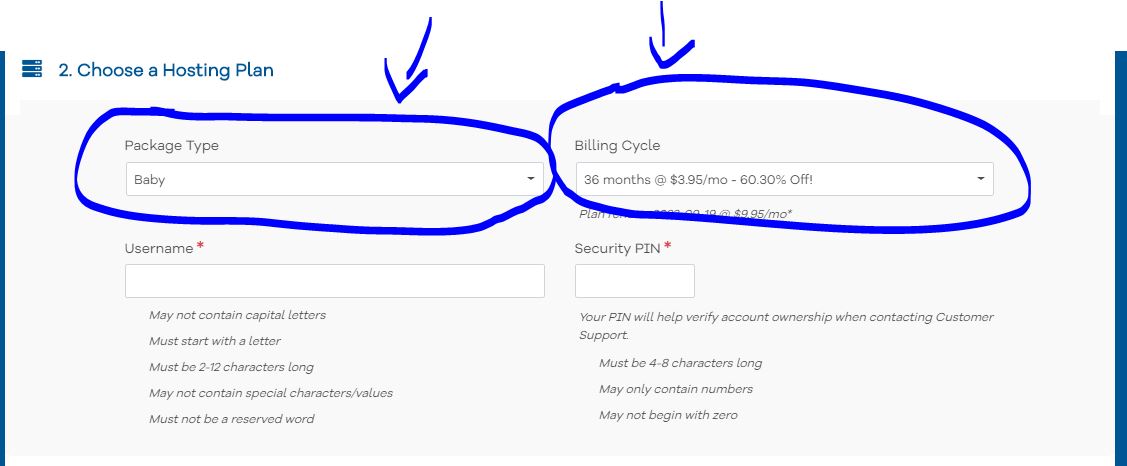
At this stage, it’s not about finding the best and most expensive hosting. It’s not about preparing for the future. It’s about taking action and getting set up so you can afford the most expensive hosting and so you know this website will have a future.
This is why I recommend choosing the Business plan, but any of the others will do. The business plan will give you the fastest loading times as well as some other handy additions, but don’t get stuck on this section. Choose any package and move on.
The billing cycle is how often you want to be billed. This ranges from 1-36 months.
The more you’re willing to pay upfront, the bigger the discount. I tend to do for the 12 or 24 months plan only because you never know what will happen.
Next, you will want to choose a username and a security pin. This information is used to login to your hosting, so make sure you write or remember this information. If you forget you can always reset it down the line.
Section Three – Enter Your Billing Information
This section is entering your best contact details and card/paypal information.
I’m confident you won’t need assistance entering this information.
Onto the next section.
Section Four- Add Additional Services
This section provides you with extra services to enhance and secure your hosting and online assets. I’ll break each one down, so you know what you are buying if you choose. I’ll recommend what I tend to buy when purchasing hosting.
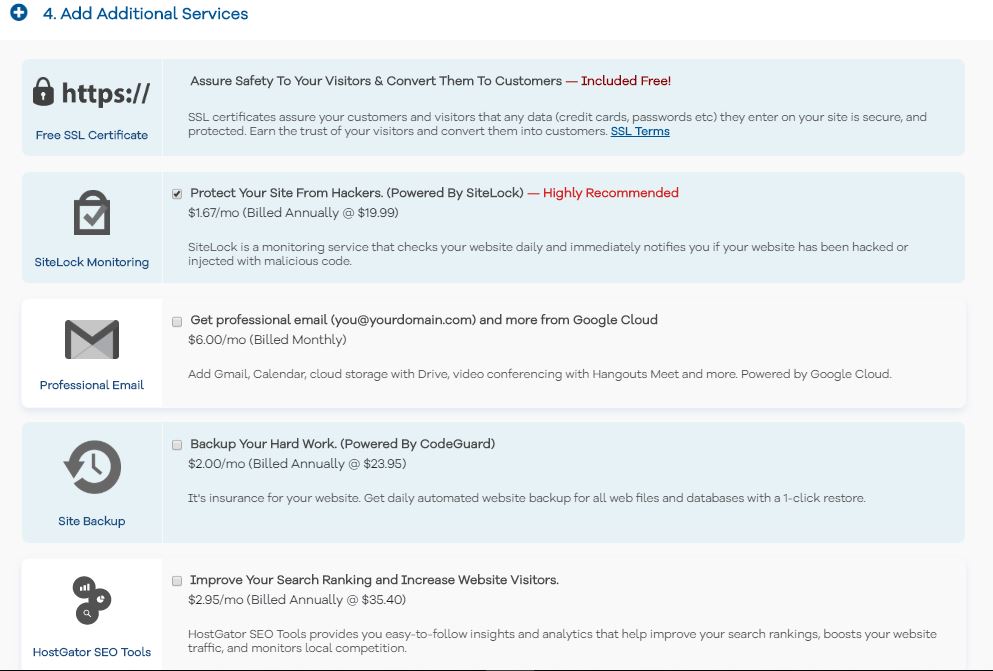
SSL Certificate: An SSL Certificate is an extra bit of security which stops hackers from stealing your customer’s information when entering it onto your website.
Google is pushing all websites to have one of these, so I recommend to get this. I believe with the discount link above you get this for free.
If for whatever reason, it’s not for free – You should get this as it affects your google rankings and tells customers your website is secure.

SiteLock Monitoring: Sitelock Monitoring is a nice little add-on which automatically scans your website every day and lets you know if something terrible has happened.
It is a good buy, but you can install free plugins onto your WordPress website. If you do install free plugins, it will slow your site down a little bit, and you will need to configure the website.
So… It’s a double-edged sword. This add-on is cheap, so if you can afford the $1.67 per month – go ahead and add it to your basket.

Professional Email: A domain email is basically this “hello@facebook.com” – it allows you to use an email with your domain.
Once again this can be done for free by merely setting up an email and pointing it to a third party application like Gmail or outlook, but you do need to know a little bit about DNS configuration which sounds more complicated than it is.
I’ve never purchased this, but if you want to get going without the complications of DNS learning than go ahead and add this to your basket.

Backup Your Work: You never know when something can happen to your site. It could be a broken plugin or a browser update. You can click on something without realising and break your website, or you can make so many edits to your site that it’s faster to restore it to a previous version than try to edit it back to how it was manually.
Either way, backups are a big YES in websites.
You have lots of free tools which can backup your site but again, its extra plugins, extra weight and more learning.
If you don’t want to learn how to install and config plugins to backup your site, this is a useful add-on for you.
It will backup your website automatically and if you do need to restore its a 1-click process.

Search Ranking: This service claims it improves your search rankings and website visitors, but I’m going to show you later on in this blog how you can do this for free…
I don’t recommend purchasing this.

The final step is to go ahead and review and confirm your order by scrolling to the bottom of the page and hitting the checkout button.

Now head over to your emails, and you should have some unread emails from Hostgator.
You want to look for the email titled something on the lines of “Your Account Info”.
Once you’re inside the email, go ahead and click the first URL to login.
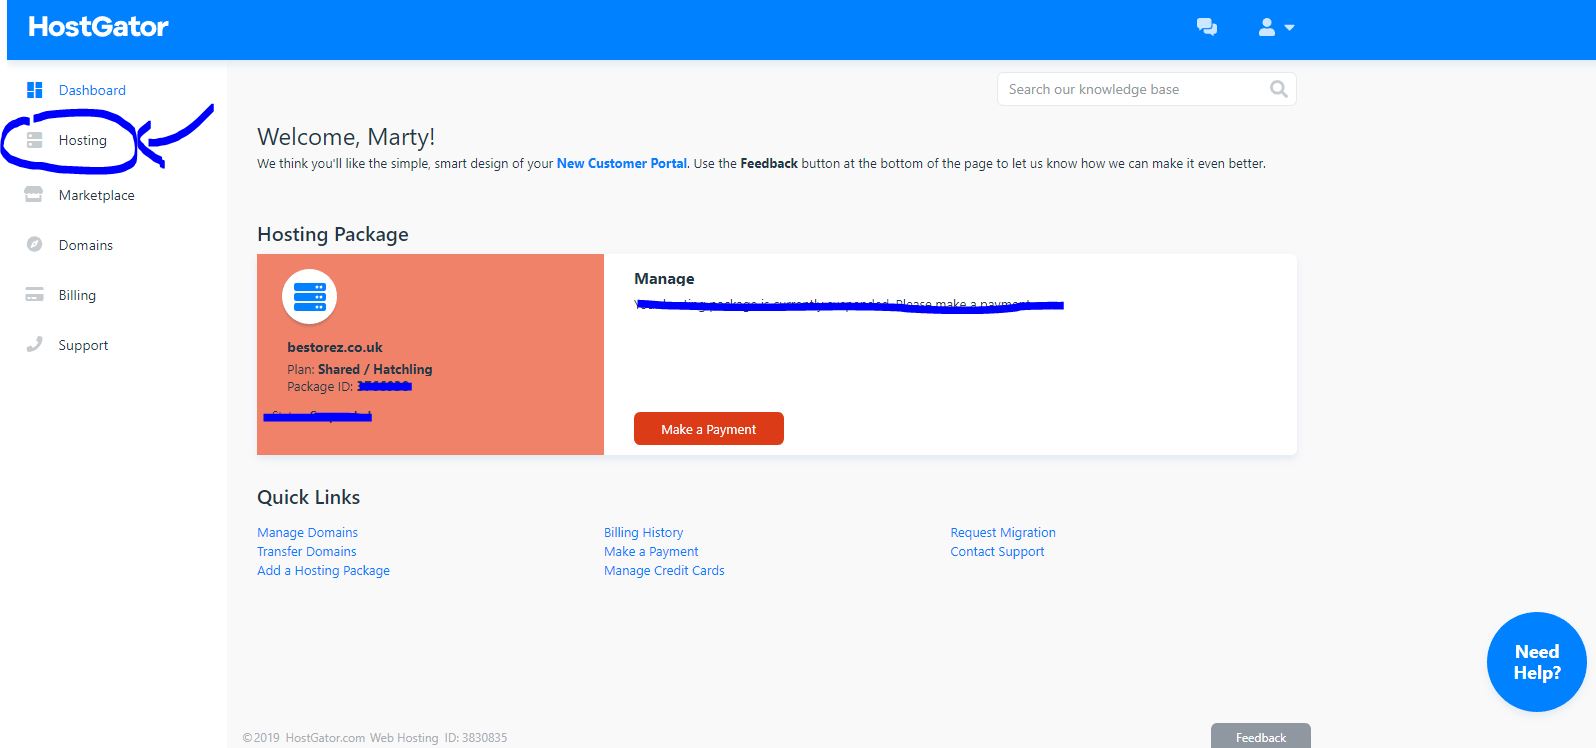
You should be taken to a page like this:
If you want to follow this video feel free to watch the step by step instructions below OR I’ve also created the text version below the video.
Installing WordPress Video
Go ahead and click the hosting OR Cpanel option on the left navigation.
You should now see a page like this:
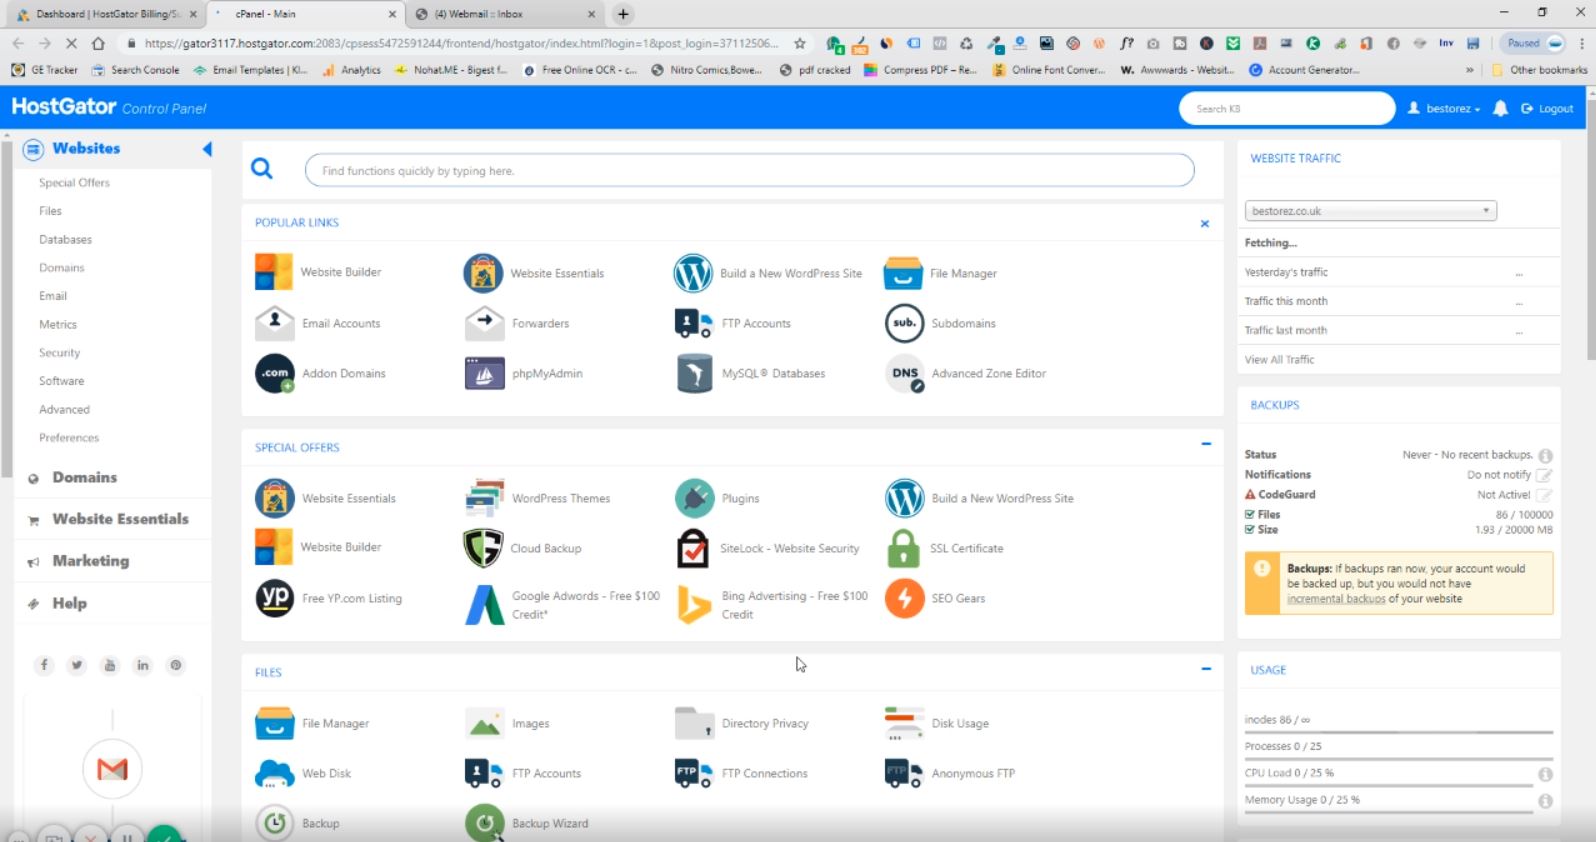
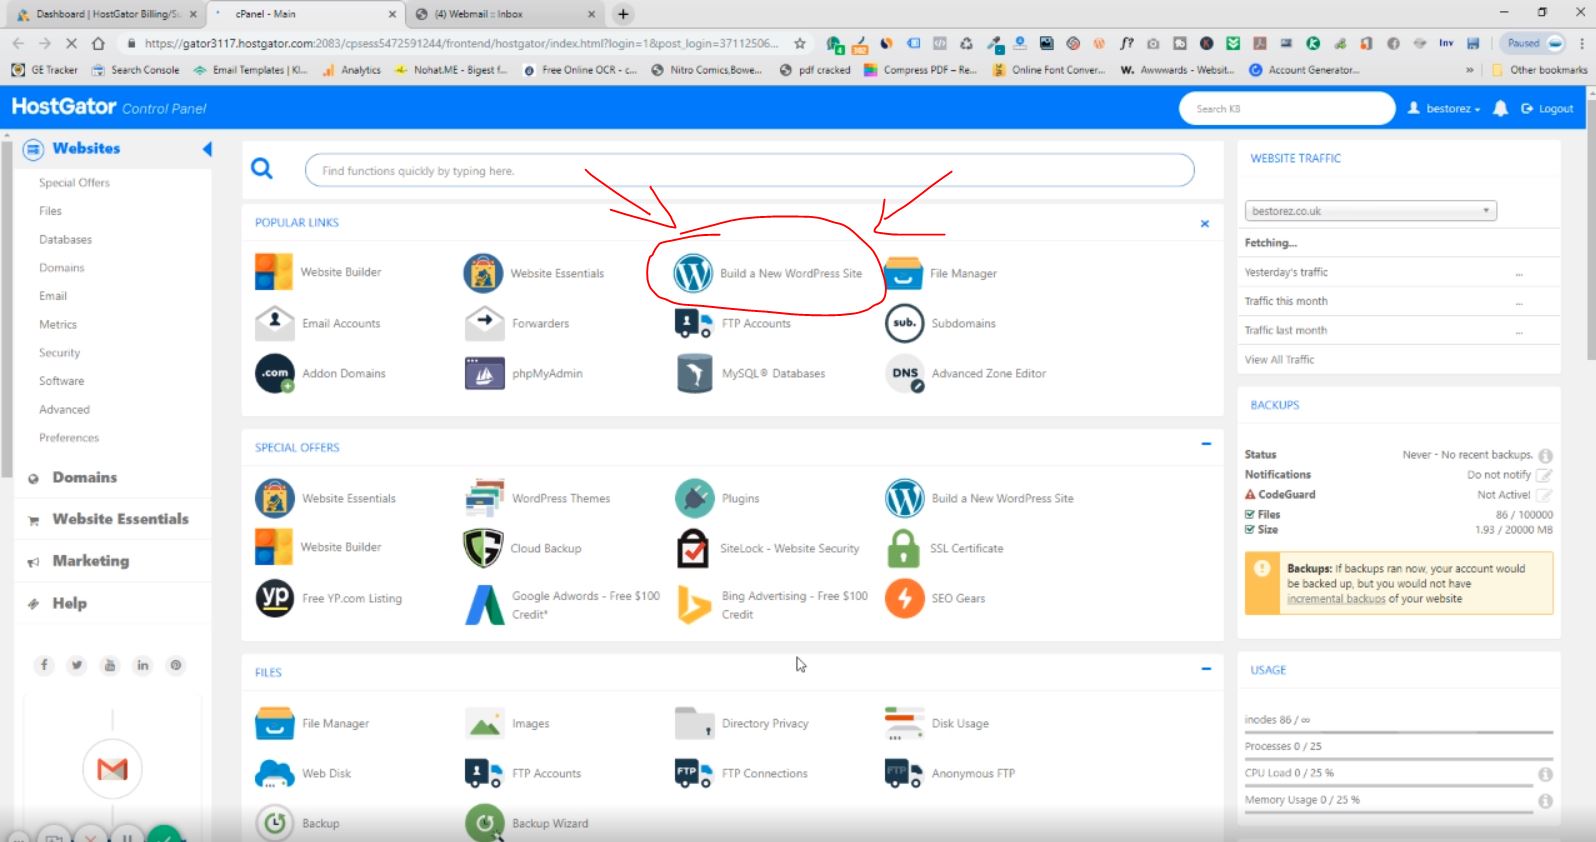
To install the actual wordpress files click on “Build a new wordpress site”
Now select your domain and press next.
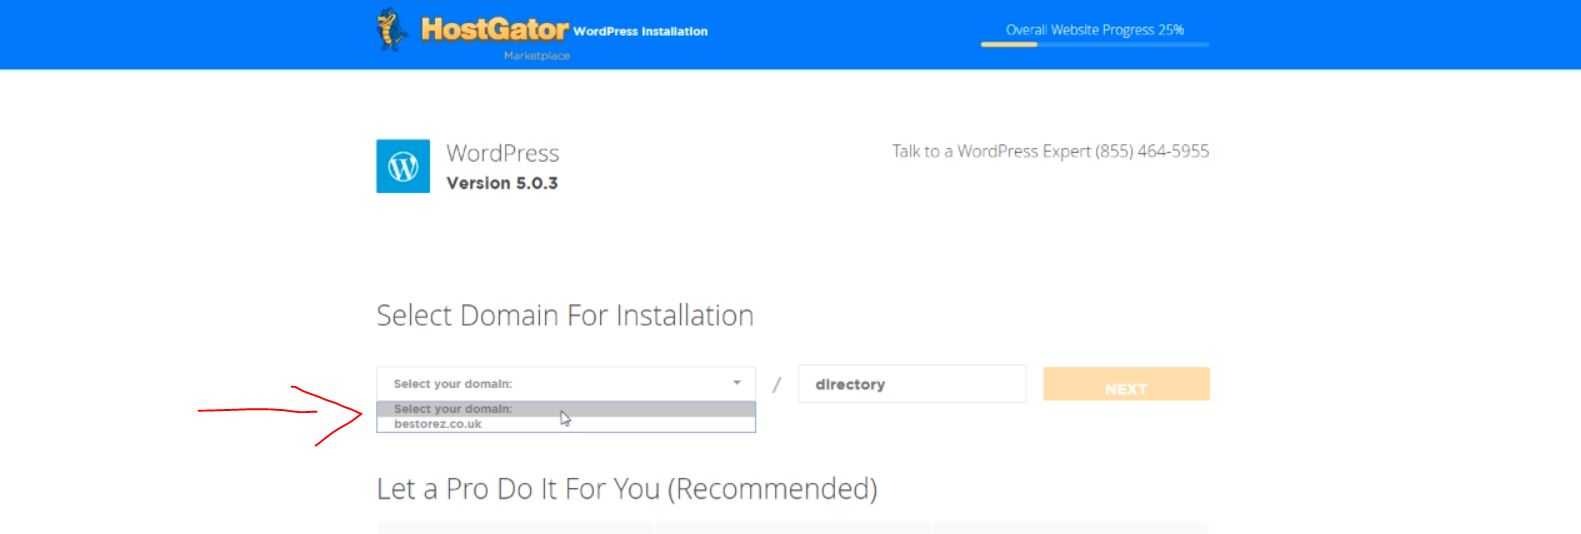
Fill out the fields with what you want but here is what is normal for these fields:
Blog Title: This is the name of your website
Admin User: this is going to be your username when you login to your wordpress website
First Name: Obv your first name
Last Name: Obv your last name.
Admin Email: Put your main email for now
All of the above info can be changed easily later on. Here is what it should look like (but with your information)
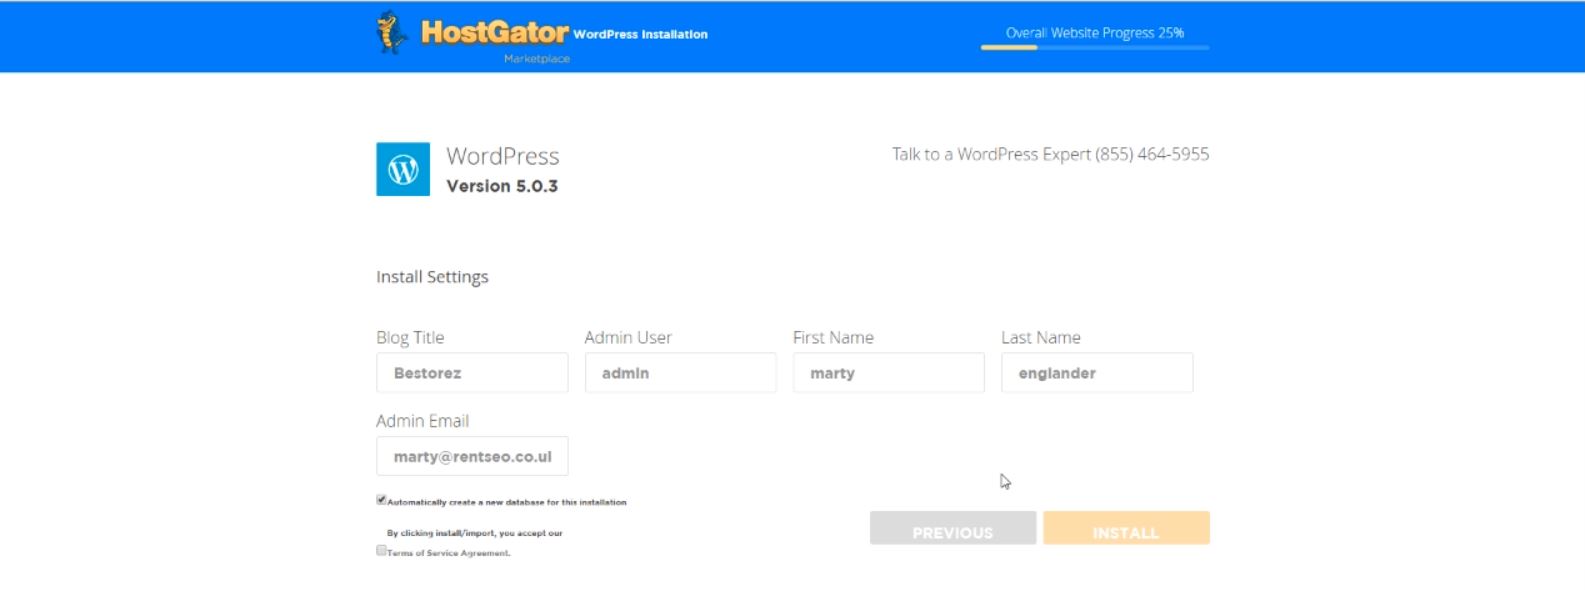
Go ahead and press install.
Congratulations – you now own your very first WordPress website.
This will take Hostgator anywhere from 10 minutes to 5 hours to do for you so please be patient.
Once the install has finished Hostgator will email you OR you can type into your browser YOURDOMAINHERE.com/wp-admin

In terms of the boring setup stage, thats it.
The next steps will be design and configuring your WordPress website to ensure Google Loves it.
YOUR TASKS
It’s all good reading this guide but if you dont apply it you’re not going to move forward. I want you to take action if you have not already.
Here is step by step what you need to do to complete this guide.
STEP 1 & 2: Decide on your domain and get your hosting -> CLICK HERE to purchase your new domain and get your discount
STEP 3: Install WordPress
Once you’ve done that you’re ready to move onto the design and configuration stage.
