Before we start the design phase of your WordPress website, you need to understand how to navigate through your WordPress Dashboard.
Here is what you’re going to understand by the end of this guide fully:
- Configuring WordPress
- Understanding Plugins
- Understanding themes
- Understanding Pages and Posts
Configuring WordPress
You want to make sure all your links and pages are set up properly. I will explain the importance of this in the SEO guide down the line, but for now, you’re still learning the ropes and its better for you to do things in the order I’m showing you to save confusion.
Everything I’m showing you now leads to a much bigger picture. Try not to question SEO etc… It’s a big topic, and you’re still learning the ropes.
Doing it this way will help you learn SEO faster when we reach that section.
To begin with what you want to do is log in to your WordPress website by visiting the URL: YOURDOMAINHERE.com/wp-admin
WordPress Configuration Video
Login to your account and visit the pages option found on the left and click add a new page.
Title the page “Home” and publish.
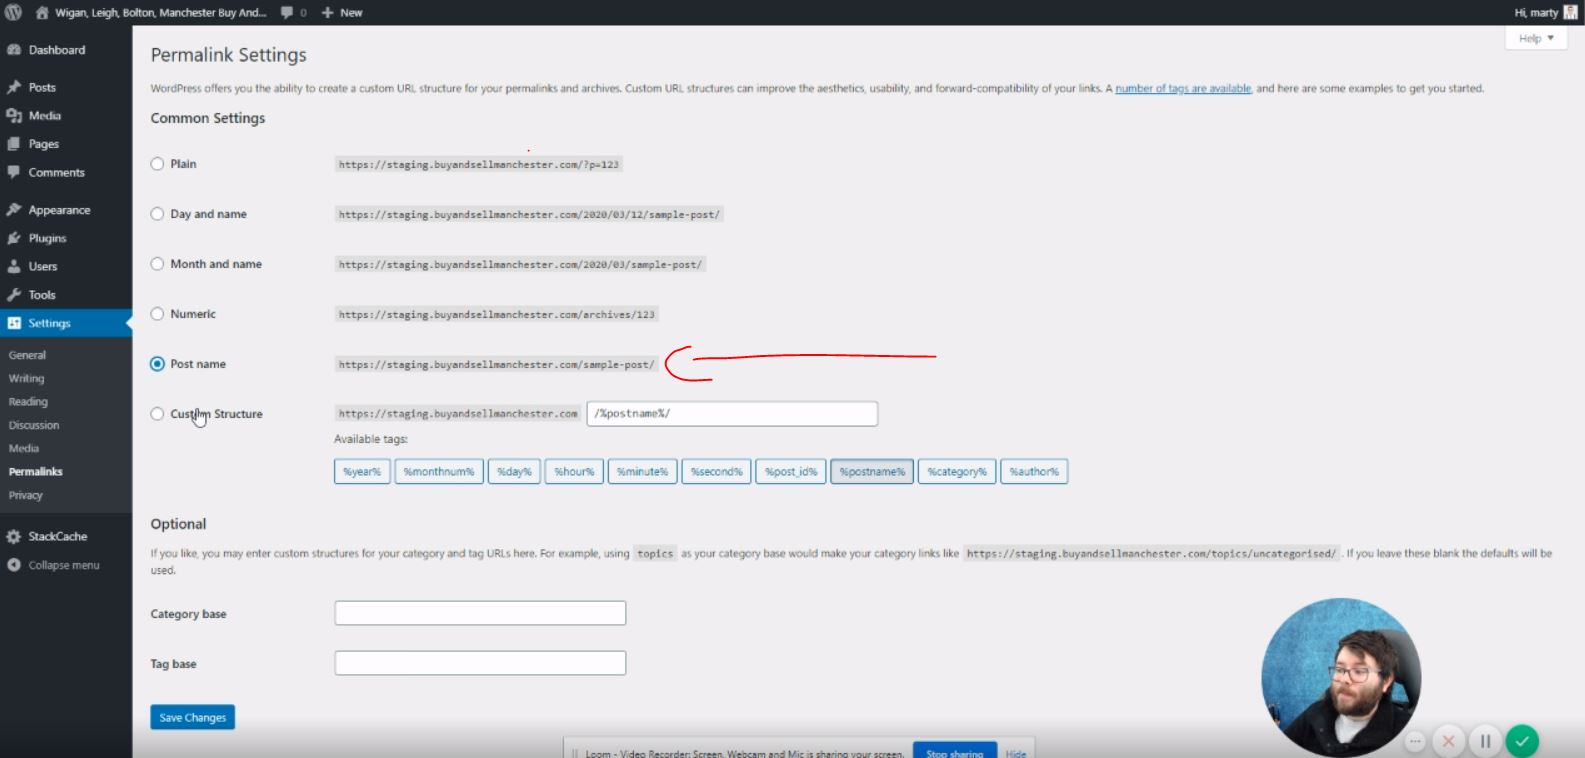
- Now go to settings -> Permalinks -> Select Posts -> save

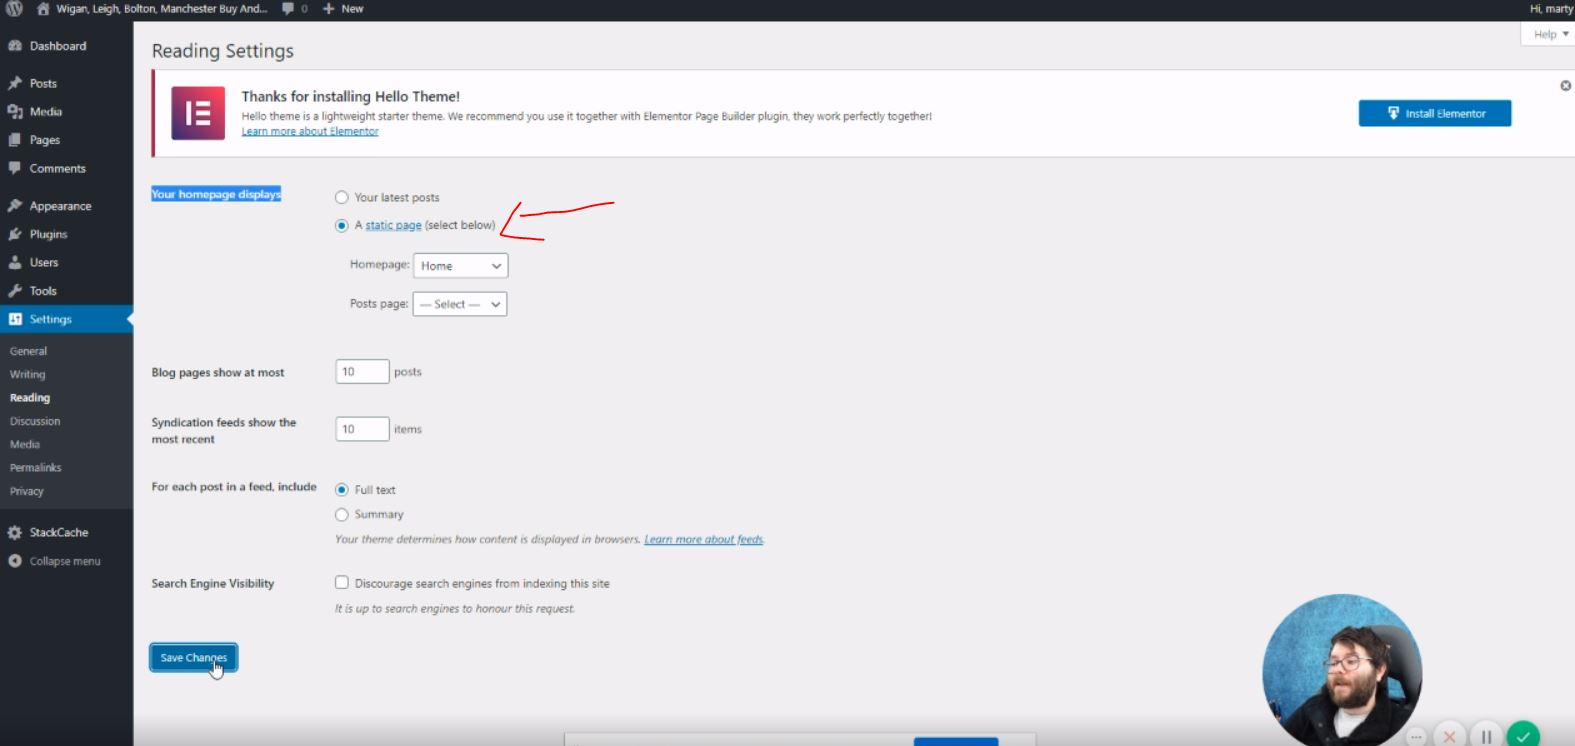
- Now go to settings -> reading -> Select a static page -> home -> save

- Now click here to download Elementor Plugin.
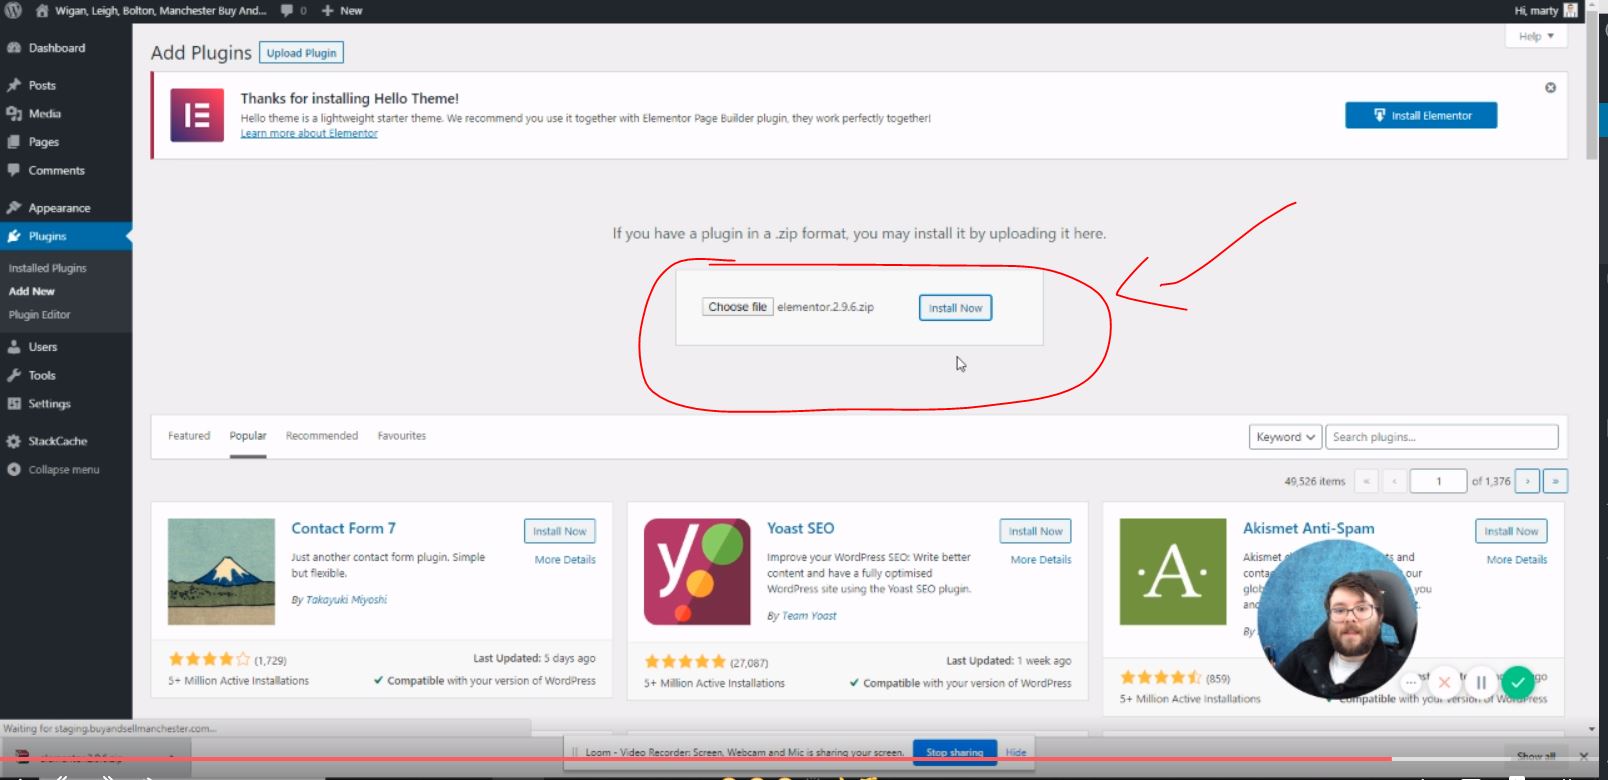
- Now go to plugins -> add new -> upload -> choose the elementor plugin -> install now -> activate

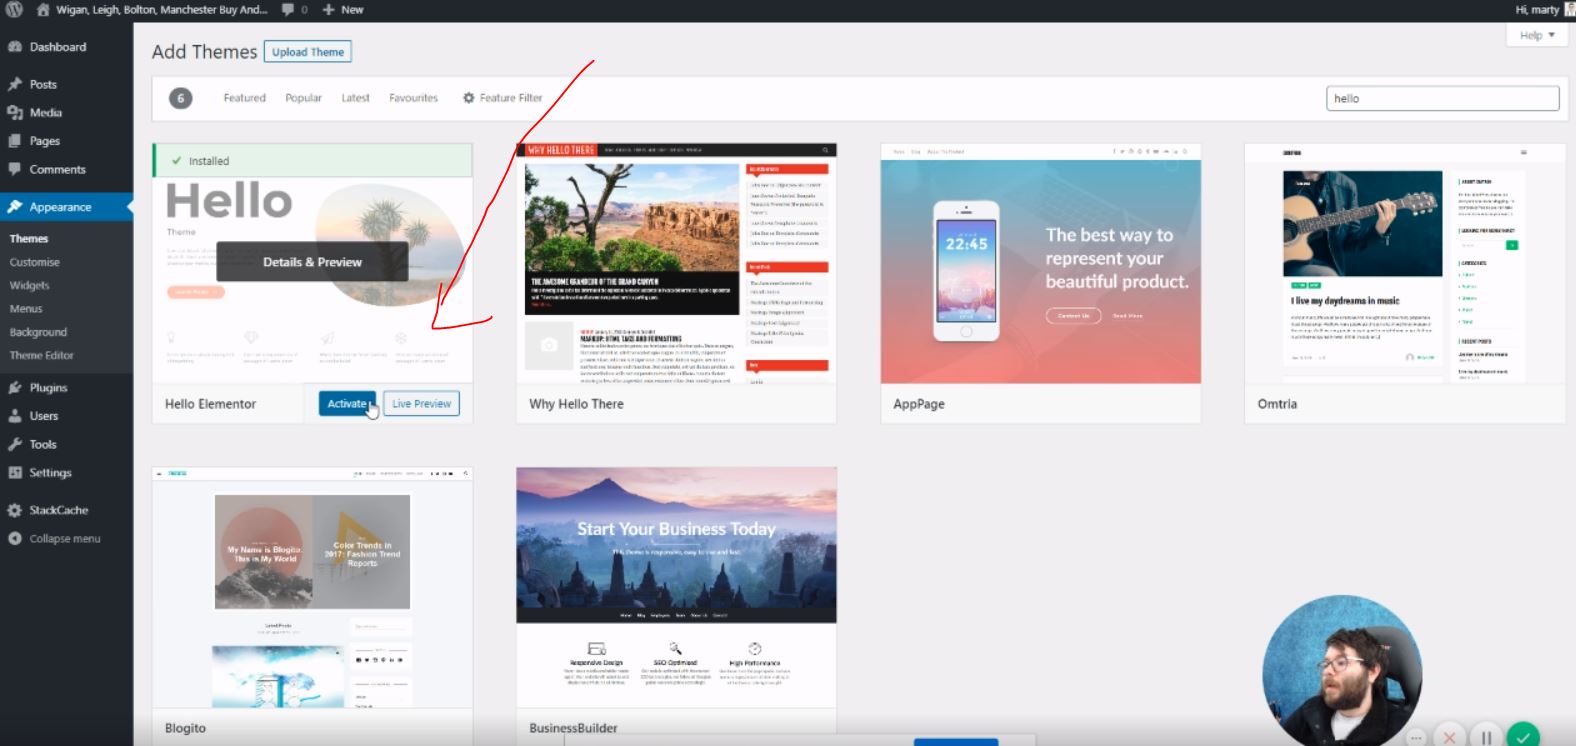
- Now go to themes -> add new -> search: hello -> install -> activate

You’re now ready to rumble.
Understanding Plugins
WordPress relies on plugins, so it’s important you understand the fundamentals of a WordPress plugin before you start creating a WordPress website.
Prefer watching a video? Have a watch of this WordPress Plugin Video below
What is a WordPress Plugin
A WordPress plugin is simply a done for you solution ready to be installed to achieve a specific(s) set of actions.
You do not need to know code to use a plugin.
Why do we use WordPress Plugins
The reason we use WordPress Plugins is to achieve specific actions and added functionality we would normally need to learn a whole group of coding languages to achieve.
Who creates WordPress Plugins
The people who create WordPress plugins are third-party developers looking to either:
- Sell needed WordPress plugins
- Trying to help non-coders achieve a great website
- Trying to create a name for really good plugins
You do need to be careful, and smart choosing which plugins to use with a WordPress website due to potential backdoors allowing hackers to gain access to your site OR some plugins may conflict with existing plugins on your site leading your WordPress site to break.
What to look for before downloading or buying a plugin
Here are some pointers you should consider before buying or downloading a plugin for your WordPress website.
1) How many active installs its got
2) How many reviews and quality of the reviews
3) When was the last time it was up updated
It’s not always fair to solely judge a plugin by the number of downloads or sales as it could be new or the developers might not be good at marketing.
Overall, do your research on the plugin, and you should be fine.
How to Install A WordPress Plugin
To install a WordPress Plugin, do the following:
Head over to your plugins -> add new -> upload plugin -> install plugin -> activate plugin
That plugin will not be available for you to use found in your menu.
Understanding Themes
Here is everything you need to know about WordPress themes.
Prefer watching a video? Have a watch of this WordPress theme Video below
What is a WordPress Theme
A WordPress Theme is a done for you style guide with extended or reduced functionality to help you get started faster.
All the questions about WordPress Plugins are the same as WordPress themes, so please reference the WordPress plugins questions above.
How to install a WordPress Theme
To install a WordPress Theme head over to your dashboard.
Hover over appearances -> Click: themes -> add new -> upload theme -> install theme -> activate theme
That theme once activated, will automatically replace all existing style guides for your site.
Understanding Pages and Posts
Here is what you need to understand about Pages and Posts.
At first, it can be confusing because they are so similar, and in reality, it would not matter if it wasn’t for SEO.
If you don’t care about Google rankings and getting new customers than don’t worry about pages and posts and do what you want BUT if you do care.
It’s important to use WordPress Pages and Posts properly.
Prefer watching a video? Have a watch of this WordPress pages and posts video below
What is a WordPress Post
A WordPress Post is an area on your site which can be published and displayed on your customer-facing side to show information.
Commonly; WordPress Posts are used for blogging.
Here are some examples of subject lines for blogs to help you understand them:
5 Easy To Use WordPress plugins
10 Ways to Setup Pages On your website
How to create a lead generation website
Each subject should contain lots of informative information about the topic.
I will cover why we should have WordPress posts in the SEO section I include down the line but for now – use WordPress Posts for blogging.
What is a WordPress Page
A WordPress page is similar to a WordPress post, BUT you do not have the option to categorise them without extended plugins.
Commonly; WordPress pages are used for created Home, about us, contact, and service pages.
For example; Let’s say you want to showcase all your services.
Let’s think of this in a folder format.
The folder name will be “Services” (In WordPress Terms Its called a Parent)
In your service page, you want to list all your services, BUT if you have 20 services, that page can become a heavy-duty and challenging to read for your customers.
This is where we break it down into “Individual Service” pages (In WordPress Terms its called child OR children)
Here is how it will look:
- Service Page (PARENT)
- WordPress Website Services (CHILD)
- SEO Services (CHILD)
- Lead Generation Services (CHILD)
Your parent page should list all your services with a snapshot of the information your viewers will find on each CHILD page.
You will also include the page link to the specific child page.
If you need more visual presentation, watch the video above where I talk and show you live how it works.
How to create a WordPress Page
Creating a WordPress Page is almost identical to create a WordPress Post, here is how you can do it.
From your WordPress dashboard find pages -> a new -> publish
You’re done.
NEXT STEPS
It’s all good reading this guide, but if you don’t apply it, you’re not going to move forward.
I want you to take action if you have not already.
Here is step by step what you need to do to complete this guide.
Step 1: Download Elementor Plugin -> Click here to download
Step 2: Install the Elementor Plugin
Step 3: Install Hello Theme
Step 5: Create a page and call it “Home”
Step 6: Change your permalinks
Step 7: Change your default landing page to your “Home” page
Step 8: Create and Publish the following pages -> About Us, Contact Us, Services
Step 9: Decide on a MINIMUM of 2 and a MAXIMUM of 5 individual services you want to list and create the individual service pages.
NOTE: you may have more than 5 services you want listing BUT focus on smaller goals first as its more important getting things going. REMEMBER, these pages require text and information so if you have 20 services you’re going to have to create 20 services which can be tedious. Add as you go TRUST ME ON THIS.
Step 10: Create text for Step 8 and Step 9 pages and add them to the fields on each page.
Once you’ve done that – move onto the next chapter where the fun begins!